本系列文章配套代码获取有以下两种途径:
-
通过百度网盘获取:
链接:https://pan.baidu.com/s/1XuxKa9_G00NznvSK0cr5qw?pwd=mnsj提取码:mnsj
-
前往GitHub获取:
https://github.com/returu/PyTorch数据集划分:
通过合理划分和使用训练集、验证集和测试集,我们可以更有效地训练神经网络模型,评估其性能,并确保其在实际应用中的泛化能力。
-
训练集(Training Set):
-
验证集(Validation Set):
-
测试集(Test Set):
划分数据集完成神经网络模型:
-
生成数据:
# 设置随机数种子,保证运行结果一致
torch.manual_seed(2024)

def get_fake_data(num):
    """
    生成随机数据,y = 0.5 * x +30并加上一些随机噪声
    """
    x = torch.randint(low = -5, high=30, size=(num,)).to(dtype=torch.float32)
    y = 0.5 * x +30 + torch.randn(num,)
    return x,y

# 生成数据
x , y = get_fake_data(num=100)
x = x * 0.1

# 增加batch维度
x = x.unsqueeze(1)
y = y.unsqueeze(1)
-
划分数据集:
# 样本总数量
n_sample = x.shape[0]

# 划分数据集
n_train = int(0.7*n_sample)
n_val = int(0.2*n_sample)
n_test = int(0.1*n_sample)

# 给定一个整数 n 作为输入,它会返回一个从 0 到 n-1 的随机排列的整数张量
suffled_indices = torch.randperm(n_sample)

# 索引张量
train_indices = suffled_indices[:n_train]
val_indices = suffled_indices[n_train:n_train+n_val]
test_indices = suffled_indices[n_train+n_val:]

# 使用索引张量构建数据集
train_x = x[train_indices]
val_x = x[val_indices]
test_x = x[test_indices]

train_y = y[train_indices]
val_y = y[val_indices]
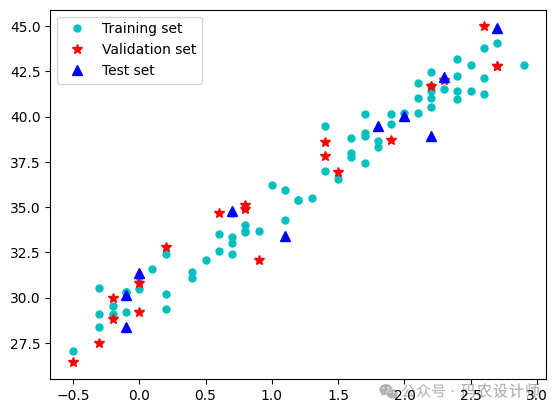
test_y = y[test_indices]# 可视化数据集
fig = plt.figure()
plt.plot(train_x , train_y , 'co' ,label='Training set',markersize=5)
plt.plot(val_x , val_y , 'r*' ,label='Validation set',markersize=7)
plt.plot(test_x , test_y , 'b^' ,label='Test set',markersize=7)
plt.legend()

-
定义模型:
# 神经网络模型
seq_model = nn.Sequential(
    nn.Linear(1,100) ,
    nn.Tanh() ,
    nn.Linear(100,10),
    nn.Tanh() ,
    nn.Linear(10,1)
)
# 定义损失函数
loss_fn = nn.MSELoss()
# 实例化一个优化器
learning_rate=1e-2

optimizer = torch.optim.SGD(seq_model.parameters() , lr=learning_rate)
from IPython import display

# 设置全局字体
plt.rcParams["font.sans-serif"] = "Microsoft YaHei"

def training_loop(n_epochs , optimizer , model , loss_fn , train_x , train_y , val_x , val_y):

    # 记录损失的列表
    train_losses = []
    val_losses = []

    for epoch in range(1 , n_epochs+1):
        #前向传播
        y_p = model(train_x)
        train_loss = loss_fn(y_p ,train_y)

        # 验证过程
        with torch.no_grad():
            val_p = model(val_x)
            val_loss = loss_fn(val_p ,val_y)

        # 梯度归零
        optimizer.zero_grad()
        # 反向传播
        train_loss.backward()
        # 参数更新
        optimizer.step()

        # 记录损失
        train_losses.append(train_loss.item())
        val_losses.append(val_loss.item())

        if epoch % 10 ==0:
            print(f"Epoch : {epoch} , Train_Loss : {train_loss} , Val_Loss : {val_loss}")
            print("-----")


return train_losses,val_losses-
循环训练:
train_losses,val_losses = training_loop(
    n_epochs=500 ,
    optimizer=optimizer ,
    model=seq_model ,
    loss_fn=loss_fn ,
    train_x=train_x ,
    train_y=train_y ,
    val_x=val_x ,
    val_y=val_y)
-
测试集拟合效果:
loss_fn(test_y , seq_model(test_x))
-
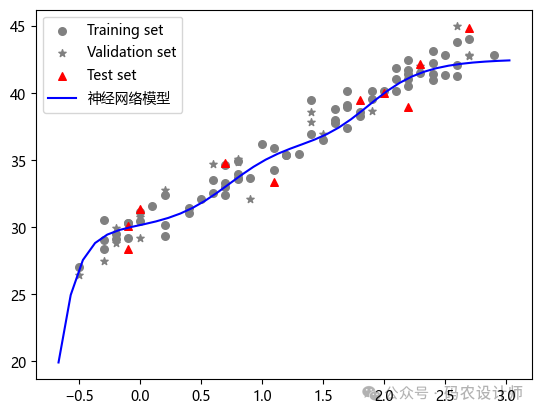
可视化结果:
# 原始数据
plt.scatter(train_x , train_y , color="gray" , marker='o' ,label='Training set',s=30)
plt.scatter(val_x , val_y , color="gray" , marker='*' ,label='Validation set',s=30)
plt.scatter(test_x , test_y , color="r" , marker='^' ,label='Test set',s=30)

# 获取xy轴的范围
xmin,xmax,ymin,ymax = plt.axis()
# 输入,模型预测值
plt.plot(torch.arange(xmin , xmax , 0.1).numpy() , seq_model(torch.arange(xmin , xmax , 0.1).unsqueeze(1)).detach().numpy() , 'b-' , label="神经网络模型")
# plt.plot(test_x , seq_model(test_x).detach().numpy() , 'k+' ,markersize=10 , label="神经网络模型预测值")

plt.legend()
plt.show()

更多内容可以前往官网查看:
https://pytorch.org/


本篇文章来源于微信公众号: 码农设计师
